Blog

  • Mom-in-law's Cobra for sale: 97 Cobra SVT Coupe, 15K miles

    Update: It’s sold.

    You know those bought-new-by-an-old-lady-and-hardly-driven sports car deals used car salesmen try to convince you you’re getting. Well this is the real deal so I thought I’d post it to my blog.

    My mom in law who is a lovely english lady with a taste for red collectible sports cars is selling her 97 Cobra SVT Coupe for a steal. She hardly drives it anymore and wants it to go to a good home. It only has 15,413 miles on the clock.

    This Cobra has the newer aluminum 4.6 liter, DOHC, modular V8 engine that is smoother and produces 305 hp and 300 lbf·ft  of torque off the factory floor.

    I’m going to cross post this to eBay motors soon, so if you read this blog you have a short while to get a first look. She’s asking $14,950. Cash only, and please bring the cash with you if you want to test drive. Sorry, but she’s heard too many joy-ride horror stories and this car is in showroom condition.

    This car is in Elizabeth, Colorado, about 40 minutes south of Denver. If I know you and you’re in Seattle or somewhere between Seattle and Denver then we can probably figure something out. Kerry and I drive the route often and we can probably drop the car off on our way to Seattle.

    V8 4.6 liter 305hp. 5 speed manual with Overdrive. ABS/Disc brakes. BOSE stereo system. Power steering, power brakes, power windows, power locks, power mirrors, power driver’s seat, air conditioning, cruise control, alarm system, dual air-bags, remote keyless entry. Rear spoiler. Black leather interior. Tinted windows. Fog lamps. California emissions system. CD player. Rear window defroster. SVT – engine has been signed by the Special Vehicle Team. Only 6,961 Cobra Coupes were made for this year.

    Service schedule followed religiously, no work done besides regular oil changes etc. This car has never been modified, chipped, etc (obviously!)

    VIN: 1FALP47V4VF193183

    If you’re interested, email me at the email address on the right or call my cell on 206-697-8723 and leave a message and I’ll call you back.

  • Basic French Bread Making For Geeks

    Update: Sorry, I accidentally deleted the video on my last update. Fixed now. Thanks Harold for the spelling corrections and pointing out a few unclear bullets in the method.

    Someone contacted me and asked how I make bread. So here’s my basic french bread recipe with a video showing the kneading and oven loading techniques. Please read the steps below because I edited the video late last night and the continuity might not be that great.

    Errata: In the video there are two errors. 1. You let it rise before each punch down. One of the punch-downs gives the impressions you punch it down, shape it and immediately punch it down again. There’s always a rise before a punch-down. 2. To clarify regarding the bakers peels: I rub all purpose flour onto my peels every few weeks just to fill the wood grain. Every time I bake I spread a thin layer of corn meal onto the area where the bread will sit. When I load the bread, some of the corn meal ends up on the baking tiles which is fine and I just clean it out after baking each time. I never layer anything on my tiles besides the bread itself and I don’t ever have sticking problems.

    This uses flour, salt, yeast and water (French law doesn’t allow anything else in a baguette dough). I make this bread about 6 times a week, hand kneading every time because you can’t replace real kneading with a mixer. It takes about 30 minutes of your day once you have the routine down. There’s nothing quite like the smell, texture and taste of fresh french bread.  Much of the enjoyment I’ve derived from bread has been the learning process, so take your time, don’t be afraid of the dough and have fun making a few funny loaves because you’ll soon be making perfect French Batards.

    Ingredients for 2 large loaves:

    • 2.5 pounds organic unbleached all purpose flour (I use the Organic – or is it Organics – brand)
    • 5 cups of water
    • 2 to 3 tablespoons of salt to taste
    • 2 teaspoons of yeast. You should probably use 3 if you’re at sealevel. Experiment.


    Equipment:

    • Scale that can weigh up to 10 pounds
    • Bread thermometer that measures at the very least from 80F to 220F
    • Dough Scraper
    • Double edged razor blade. (from any pharmacy)
    • Two wooden bakers peels that have had flour rubbed into them occasionally and coated with corn flour.
    • Enough baking tiles to fit two loaves into your oven
    • A large cast iron pan to go under the baking tiles and preheat with them
    • A kettle with boiling water for when you load the bread
    • Cooling rack
    • Hungry friends and a bottle of good red wine

    Method:

    1. Add the 2.5 pounds of flour and 5 cups of water together in a bowl. I like to use slightly warm water, but cold is OK.
    2. Mix the flour and water until all the flour is wet. I use a wooden spoon and it takes about 3 mins.
    3. Let stand for a minimum of 20 minutes and a max of 3 to 5 hours. This is called an Autolyse and was invented by the late chef Raymond Calvel. It has a profound effect on the quality of bread. It becomes moister, the crust is crunchy but chewy (yeah, believe it or not), the bread lasts longer and you get a better oven bounce. The process relaxes the gluten and lets the flour absorb more water. It also makes kneading easier. Initially the dough is stickier than normal, but it saves you having to knead as long because the gluten develops sooner.
    4. Once the autolyse has finished…
    5. Add 2 tsp yeast and 2 tsp warm water (no hotter than 100F – measure it with your bread thermometer) to a cup. Mix with your thermometer. Let stand for 30 seconds.
    6. Add flour into your autolyse (just guess how much – don’t dry it out) and mix with a wooden spoon until it gets a little firmer than the porridgy consistency you currently have.
    7. Pour the mess onto your counter.
    8. Fold in the yeast and water.
    9. Now you can start kneading (see video for technique). As it gets too wet, add a little more flour to make it more manageable. It’s very important you keep the dough as wet as you can possibly handle.
    10. Now alternate between folding air into it and french banging-the-dough kneading technique. Do this for about 2 minutes until the yeast is well blended into the dough.
    11. Now add salt. I measure about 3 tablespoons for 2.5 pounds of flour using my hand. You might try measuring 3 tablespoons into your hand and then you’l know for future reference.
    12. Pour the salt over the dough and knead the dough to pick up the rest of the salt.
    13. Now the real kneading starts. Knead alternating between folding and banging for 7 minutes. French chefs teach that you have to bang the dough about 600 times. I don’t think I’ve ever reached that much.
    14. Once the dough is kneaded, shape it into a ball and cover with a floured towel.
    15. Let rise for 1 hour.
    16. Knock down, shape and cover and let rise for another hour.
    17. Knock down shape and cover and let rise for another hour. (that’s not an accidental duplicate paragraph)
    18. Knock it down one last time and fold over two sides to make a roll.
    19. Prepare two baker’s peels with corn flour. I put the breads on the edge of the peel because I load them sideways into the oven. (see video)
    20. Cut the roll in half.
    21. Shape each half into a ball and roll flat with a rolling pin.
    22. Roll or fold each flat half into a batard and pinch closed the seam. A batard is french for Bastard and it means an inferior baguette. Your oven probably isn’t big enough to make a proper baguette and a boule (round bread) isn’t as good for sandwiches.
    23. Load each loaf into each bakers peel. See video for technique for working with very wet dough when doing this.
    24. Cut cross cuts on top of the bread with a old fashioned double edged razor blade. Not too deep.
    25. Preheat oven with baking tiles and cast iron pan (see video for the positions I use in the oven) to 400F and let the bread rise for about 30 minutes (about as long as the preheat takes).
    26. When oven is preheated, boil kettle.
    27. Load loaves into oven . This is the toughest part and I screw up the first loaf in the video, but it turns out fine. Just relax and if you mess it up, adjust the loaf position with the scraper. This whole process takes practice and timing.
    28. As soon as the loaves are loaded do the following:
    29. CAUTION: PLEASE BE CAREFUL DOING THIS. Cover your oven door glass with a dry towel. Also some ovens don’t handle steam well – it can mess up electrics. And you’re about to pour boiling hot water into a boiling hot pan. You may want to wear goggles because you’ll probably get splashed in the eyes at least once.
    30. Pour the boiling hot water into the cast iron pan and immediately close the oven door. I manage to pour into the pan while it’s in it’s final position with the door closed. But it may help to pull it out slightly and then use the door to push it closed (CAREFULLY, you can smash your glass if you’re too quick).
    31. Close the oven quickly to trap the steam. You’ll see the loaves get nice and wet from the steam on the outside if you do this right.
    32. At 6500 ft I bake for 44 minutes.
    33. After 44 minutes, take the loaves out and measure internal temp with a bakers thermometer. It should be 190F to 200F. Any hotter and it will be dry. If the temp is lower than 188F then put it back in for another 5 mins and check again using a different hole.
    34. Let cool for 20 minutes. You can eat them right away, but you’ll crush the bread slighly and the cutting will probably make the crumb a bit doughy. Every minute you can stand waiting will make the bread a little stronger and give it a better texture.
    35. As the bread cools the crust will soften.
    36. If you like a very soft crust you can put a towel over the bread while it cools.
    37. If you like a very crispy crust, alter this recipe to either bake at 425F or higher. Or you can start as high as 550F (which smells up the kitchen) and preheat for 1.5 hours. Then put the bread in and immediatelly drop the temp to 400F or even 375F.
    38. Experiment!!!!! This recipe is one I took months to develop and it’s reliable for the altitude I’m at and the kind of bread I want. I also recommend getting the basic french ingredients of flour, salt and yeast perfect before you start adding things like butter, cheese, nuts, grains, etc.

    If you enjoyed this recipe or are also a baker, please post your feedback in the comments. I love learning from other bakers.


  • Advanced WordPress: The Basic WordPress Speedup

    There are many caching products, plugins and config suggestions for WordPress.org blogs and sites but I’m going to take you through the basic WordPress speedup procedure. This will give you a roughly 280% speedup and the ability to handle high numbers of concurrent visitors with little additional software or complexity. I’m also going to throw in a few additional tips on what to look out for down the road, and my opinion on database caching layers. Here goes…

    How Fast is WordPress out of the Box?

    [HP/S = Home Page Hits per second and BE/S = Blog Entry Page Hits per Second]

    Lets start with a baseline benchmark. WordPress, out of the box, no plugins, running on a Linode 512 server will give you:

    14.81 HP/S and 15.27 BE/S.

    First add an op code cache to speed up PHP execution

    That’s not bad. WordPress out of the box with zero tweaking will work great for a site with around 100,000 daily pageviews and a minor traffic spike now and then. But lets make a ridiculously simple change and add an op code cache to PHP by running the following command in the Linux shell as root on Ubuntu:

    apt-get install php-apc

    And lets check our benchmarks again:

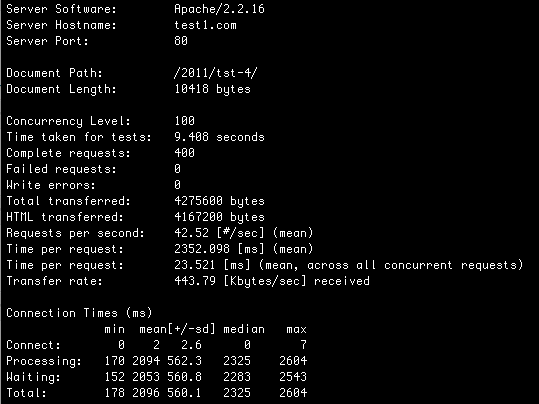
    41.97 HP/S and 42.52 BE/S

    WOW! That’s a huge improvement. Lets do more…

    Then install Nginx to handle high numbers of concurrent visitors

    Most of your visitors take time to load each page. That means they stay connected to Apache for as much as a few seconds, occupying your Apache children. If you have keep-alive enabled, which is a good thing because it speeds up your page load time, each visitor is going to occupy your Apache processes for a lot longer than just a few seconds. So while we can handle a high number of page views that are served up instantly, we can’t handle lots of visitors wanting to stay connected. So lets fix that…

    Putting a server in front of Apache that can handle a huge number of concurrent connections with very little memory or CPU is the answer. So lets install Nginx and have it deal with lots of connections hanging around, and have it quickly connect and disconnect from Apache for each request, which frees up your Apache children. That way you can handle hundreds of visitors connected to your site with keep-alive enabled without breaking a sweat.

    In your apache2.conf file you’ll need to set up the server to listen on a different port. I modify the following two lines:

    NameVirtualHost *:8011

    Listen 127.0.0.1:8011

    #Then the start of my virtualhost sections also looks like this:

    <VirtualHost *:8011>


    In your nginx.conf file, the virtual host for my blog looks like this (replace test1.com with your hostname)

    #Make sure keepalive is enabled and appears somewhere above your server section. Mine is set to 5 minutes.

    keepalive_timeout  300;

    server {
    listen 80;
    server_name .test1.com;
    access_log logs/test.access.log main;
    location / {
    proxy_pass http://127.0.0.1:8011;
    proxy_set_header host $http_host;
    proxy_set_header X-Forwarded-For $remote_addr;
    }

    And that’s basically it. Other than the above modifications you can use the standard nginx.conf configuration along with your usual apache2.conf configuration. If you’d like to use less memory you can safely reduce the number of apache children your server uses. My configuration in apache2.conf looks like this:

    <IfModule mpm_prefork_module>
    StartServers 15
    MinSpareServers 15
    MaxSpareServers 15
    MaxClients 15
    MaxRequestsPerChild 1000
    </IfModule>

    With this configuration the blog you’re busy reading has spiked comfortably to 20 requests per second (courtesy of HackerNews) without breaking a sweat. Remember that Nginx talks to Apache only for a few microseconds for each request, so 15 apache children can handle a huge number of WordPress hits. The main limitation now is how many requests per second your WordPress installation can execute in terms of PHP code and database queries.

    You are now set up to handle 40 hits per second and high concurrency. Relax, life is good!

    With Nginx on the front end and your op code cache installed, we’re clocking in at:

    41.23 HP/S and 43.21 BE/S


    We can also handle a high number of concurrent visitors. Nginx will queue requests up if you get a worst case scenario of a sudden spike of 200 people hitting your site. At 41.23 HP/S it’ll take under 5 seconds for all of them to get served. Not too bad for a worst case.

    Compression for the dialup visitors

    Latency, or the round trip time for packets on the Internet is the biggest slow down for websites (and just about everything else that doesn’t stream). That’s why techniques like keep-alive really speed things up because they avoid a three way handshake when visitors to your site establish their connections. Reducing the amount of data transferred by using compression doesn’t give a huge speedup for broadband visitors, but it will speed things up for visitors on slower connections. To add Gzip to your Nginx configuration, simply add the following to the top of your nginx.conf file:

    gzip on;
    gzip_min_length 1100;
    gzip_buffers 4 8k;
    gzip_types text/plain text/css application/x-javascript application/javascript text/xml application/xml application/xml+rss text/javascript;

    We’re still benchmarking at:

    40.26 HP/S and 44.94 BE/S


    What about a database caching layer?

    The short answer is: Don’t bother, but make darn sure you have query caching enabled in MySQL.

    Here’s the long answer:

    I run WordPress on a 512 Linode VPS which is a small but popular configuration. Linode’s default MySQL configuration has 16M key buffer for MyISAM key caching and it has the query cache enabled with 16M available.

    First I created a test Linode VPS to do some benchmarking. I started with a fresh WordPress 3.1.3 installation with no plugins enabled. I created a handful of blog entries.

    Then I enabled query logging on the mysql server and hit the home page with a fresh browser with an empty cache. I logged all queries that WordPress used to generate the home page. I also hit refresh a few times to make sure there were no extra queries showing up.

    I took the queries I saw and put them in a benchmarking loop.

    I then did the same with a blog entry page – also putting those queries in a benchmark script.

    Here’s the resulting script.

    Benchmarking this on a default Linode 512 server I get:

    447.9 home page views per second (in purely database queries).

    374.14 blog entry page views per second (in purely database queries).

    What this means is that the “problem” you are solving when adding a database caching layer to WordPress is the database’s inability to handle more than 447 home page views per second or 374 blog entry page views per second (on a Linode 512 VPS).

    So my suggestion to WordPress.org bloggers is to forgo adding the complexity of a database caching layer and focus instead on other areas where real performance issues exist (like providing a web server that supports keep-alive and can also handle a high number of concurrent visitors – as discussed above).

    Make sure there are two lines in your my.cnf mysql configuration file that read something like:

    query_cache_limit       = 1M

    query_cache_size        = 16M

    If they’re missing your query cache is probably disabled. You can find your mysql config file at /etc/mysql/my.cnf on Ubuntu.

    Footnotes:

    Just for fun, I disabled MySQL’s query cache to see how the benchmarking script performed:

    132.1 home page views per second (in DB queries)

    99.6 blog entry page views per second (in DB queries)

    Not too bad considering I’m forcing the db to look up the data for every query. Remember, I’m doing this on one of the lowest end servers money can buy. So how does this perform on a dedicated server with Intel Xeon E5410 processor, 4 gigs of memory and 15,000 rpm mirrored SAS drives? [My dev box for Feedjit 🙂  ]

    1454.6 home page views per second

    1157.1 blog entry page views per second

    Should you use browser and/or server page caching?

    Short answer: Dont’ do it.

    You could force browsers to cache each page for a few minutes or a few hours. You could also generate all your wordpress pages into static content every few seconds or minutes. Both would give you a significant performance boost, but will hurt the usability of your site.

    Visitors will hit a blog entry page, post a comment, hit your home page and return to the blog entry page to check for replies. There may be replies, but they won’t see them because you’ve served them a cached page. They may or may not return. You make your visitor unhappy and lose the SEO value of the comment reply they could have posted.

    Heading into the wild blue yonder, what to watch out for…

    The good news is that you’re now set up to handle big traffic spikes on a relatively small server. Here are a few things to watch out for:

    Watch out for slow plugins, templates or widgets

    WordPress’s stock installation is pretty darn fast. Remember that each plugin, template and widget you install executes it’s own PHP code. Now that your server is configured correctly, your two biggest bottlenecks that affect how much traffic you can handle are:

    1. Time spent executing PHP code
    2. Time spent waiting for the database to execute a query

    Whenever you install a new plugin, template or widget, it introduces new PHP code and may introduce new database queries. Do one or all of the following:

    1. Google around to see if the plugin/widget/template has any performance issues
    2. Check the load graphs on your server for the week after you install to see if there’s a significant increase in CPU or memory usage or disk IO activity
    3. If you can, use ‘ab’ to benchmark your server and make sure it matches any baseline you’ve established
    4. Use Firebug, YSlow or the developer tools in Chrome or Safari (go to the Network panel) and check if any page component is taking too long to load. Also notice the size of each component and total page size.

    Keep your images and other page components small(ish)

    Sometimes you just HAVE to add that hi-res photo. As I mentioned earlier, latency is the real killer, so don’t be too paranoid about adding a few KB here and there for usability and aesthetics. But mind you don’t accidentally upload an uncompressed 5MB image or other large page component, unless that was your intention.

    Make sure any Javascript is added to the bottom of your page or is loaded asynchronously

    Javascript execution can slow down your page load time if it executes as the page loads. Unless a vendor tells you that their javascript executes asynchronously (without causing the page to wait), put their code at the bottom of the page or you’ll risk every visitor having to wait for that javascript to see the rest of your page.

    Don’t get obsessive, it’s not healthy!

    It’s easy to get obsessed with eeking out every last millisecond in site performance. Trust me, I’ve been there and I’m still in recovery. You can crunch your HTML, use CSS sprites, combine all scripts into a single script, block scrapers and Yahoo (hehe), get rid of all external scripts, images and flash, wear a woolen robe, shave your head and only eat oatmeal. But you’ll find you hit a point of diminishing returns and the time you’re spending preparing for those traffic spikes could be better spent on getting the traffic in the first place. Get the basics right and then deal with specific problems as they arise.

    “We should forget about small efficiencies, say about 97% of the time: premature optimization is the root of all evil” ~Donald Knuth

    Conclusion

    The two most effective things you can do to a new WordPress blog to speed it up are to add an op code cache like APC, and to configure it to handle a high number of concurrent visitors using Nginx. Nothing else in my experience will give you a larger speed and concurrency improvement. Please let me know in the comments if you’ve found another magic bullet or about any errors or omissions. Thanks.


  • Can WordPress Developers survive without InnoDB? (with MyISAM vs InnoDB benchmarks)

    Update: Thanks Matt for the mention and Joseph for the excellent point in the comments that WordPress in fact uses whatever MySQL’s default table handler is, and from 5.5 onwards, that’s InnoDB – and for his comments on InnoDB durability.

    My development energy has been focused on WordPress.org a lot during the past few months for the simple reason that I love the publishing platform and it’s hard to resist getting my grubby paws stuck into the awesome plugin API.

    To my horror I discovered that WordPress installs using the MyISAM table engine. [Update: via Joseph Scott on the Automattic Akismet team: WordPress actually specifies no table type in the create statements, so it uses MySQL’s default table engine which is InnoDB from version 5.5 onwards. See the rest of his comment below.] I absolutely loathe MyISAM because it has burned me badly in the past when table locking killed performance in very high traffic apps I’ve built. Converting to InnoDB saved the day and so I have a lot of love for the InnoDB storage engine.

    Many WordPress hosts like Hostgator don’t support anything but the default MyISAM table type that WordPress uses and they’ve made it clear they don’t plan to change.

    While WordPress is a mostly read-only application that doesn’t suffer too badly with read/write locking issues, the plugin I’m developing will be doing a fair amount of writing, so the prospect of being stuck with MyISAM is a little horrifying.

    So I set out to figure out exactly how bad my situation is being stuck with MyISAM.

    I created a little PHP script (hey, it’s WordPress so gotta go with PHP) to benchmark MySQL with both table types. Here’s what the script does:

    • Create a table using the MyISAM or InnoDB table type (depending on what we’re benching)
    • The table has two integer columns (one is a primary key) and a 255 character varchar.
    • Insert 10,000 records with randomly generated strings of 255 chars in length.
    • Fork X number of processes (I start with one and gradually increase to 56 processes)
    • Each process has a loop that iterates a number of times so that we end up with 1000 iterations evenly spaced across all processes.
    • In each iteration we do an “insert IGNORE” that may or may not insert a record, a “select *” that selects a random record that may or may not exist, and then a “delete from table order by id asc limit 3” and every second delete orders “desc” instead.
    • Because the delete is the most resource intensive operation I decided to bench it without the delete too.

    The goal is not to figure out if WordPress needs InnoDB. The answer is that it doesn’t. The goal is to figure out if plugin developers like me should be frustrated or worried that we don’t have access to InnoDB on many WordPress hosting provider platforms.


    NOTE: A lower graph is better in the benchmarks below.


    MyISAM vs InnoDB doing Insert IGNORE and Selects up to 56 processes

    The X axis shows number of threads and the Y axis shows the total time for each thread to complete it’s share of the loop iterations. Each loop does an “insert ignore” and a “select” from the primary key id.

    The benchmark below is for a typical write intensive application where multiple threads (up to 56) are selecting and inserting into the same table. I was expecting InnoDB to murder MyISAM with this benchmark, but as you can see they are extremely close (look at the Y axis on the left) and are both very fast. Not only that but they are both very stable as concurrency increases.


    MyISAM vs InnoDB doing Insert IGNORE, Selects and delete with order by

    The X axis shows number of threads and the Y axis shows the total time for each thread to complete it’s share of the loop iterations. Each loop does an “insert ignore”, a “select” from the primary key id AND a “delete from table order by id desc limit 3 (or asc every second iteration).

    This is a very intensive test in terms of locking because you have both the write operation of the insert combined with a small ordered range of records being deleted each iteration. I was expecting MyISAM to basically stall as threads increased. Instead I saw the strangest thing…..


    Rather than MyISAM stalling and InnoDB getting better under a highly concurrent load, InnoDB gave me two spikes as concurrency increased. So I did the benchmark again because I thought maybe a cron job fired on my test machine…..

    While doing the second test I kept a close eye on memory and the machine had plenty to spare. The only explanation I can come up with is that InnoDB did a buffer flush or log flush at the same point in each benchmark which killed performance.


    Conclusions

    Firstly, I’m blown away by the performance and level of concurrency that MyISAM delivers under heavy writes. It may be benefitting from concurrent inserts, but even so I would have expected it to get killed with my “delete order by” query.

    I don’t think the test I threw at InnoDB gives a complete picture of how amazing the InnoDB storage engine actually is. I use it in extremely large scale and highly concurrent environments and I use features like clustered indexes and cascading deletes via relational constraints and the performance and reliability is spectacular. But as a basic “does MyISAM completely suck vs InnoDB?” test I think this is a useful comparison, if somewhat anecdotal.

    Resources and Footnotes

    You can find my benchmark script here. Rename it to a .php extension once you download it.

    I’m running MySQL Server version: 5.1.49-1ubuntu8.1 (Ubuntu)

    I’m running PHP:
    PHP 5.3.3-1ubuntu9.5 with Suhosin-Patch
    Zend Engine v2.3.0

    Both InnoDB and MyISAM engines were tuned using the following parameters:

    InnoDB:
    innodb_flush_log_at_trx_commit = 0
    innodb_buffer_pool_size = 256M
    innodb_additional_mem_pool_size = 20M
    innodb_log_buffer_size = 8M
    innodb_max_dirty_pages_pct = 90
    innodb_thread_concurrency = 4
    innodb_commit_concurrency = 4
    innodb_flush_method = O_DIRECT

    MyISAM:
    key_buffer = 100M
    query_cache_limit = 1M
    query_cache_size = 16M

    Binary logging was disabled.
    The Query log was disabled.

    The machine I used is a stock Linode 512 instance with 512 megs of memory.
    The virtual CPU shows up as four:
    Intel(R) Xeon(R) CPU L5520 @ 2.27GHz
    with bogomips : 4533.49

    I’m running Ubuntu 10.10 Maverick Meerkat
    I’m running: Linux dev 2.6.32.16-linode28 #1 SMP

  • Running form

    I’ve starting taking my running a bit more seriously this year, feeling the need for speed, so I’ve been looking at running form. My two favorite videos so far:

    My favorite video – Ryan Hall in super slow motion with pretty much god-like form at the Boston 2010 Marathon. This video has caused me to completely adjust my form. Initially I’m focusing on landing without heel strike i.e. on a more flat foot and more forward lean with more pronounced kick as my foot leaves the ground. My shins, achilles and calves aren’t thanking me for the change, but they’re getting used to it quickly. The next goal is to focus on higher butt kicks which makes my leg a more efficient lever arm on the forward swing.

    And Robert Cheriuyot who won the 2010 Boston (with an unfortunate slip on the finish line that resulted in a concussion) also showing perfect form.

  • MI6 to Rest of World: Cyber War is On. Anyone, Anywhere is Fair Game. Arm yourselves.

    This incredibly disturbing story was posted on Hacker News 26 minutes ago.

    Summary: The London Daily Telegraph (via TheAge.com.au) is reporting that British Intelligence agents from MI6 and GCHQ hacked into an AlQueda online magazine and removed instructions for making a pipe bomb. They replaced the article with a cupcake recipe. A Pentagon operation was blocked by the CIA because the website was seen as an important source of intelligence. Furthermore, both British and US intelligence have developed “a variety of cyber-weapons such as computer viruses, to use against enemy states and terrorists”.

    There is no reporting on where the servers of the magazine are based, who owns the lease on them (a US or British citizen?) and under what jurisdiction these attacks were made.

    The message this attack sends to the rest of the world is “Cyber war is on. Anyone, anywhere is fair game. Arm yourselves.”.

    As an Internet entrepreneur this is incredibly disturbing because it makes it OK for any government agency to target our servers and the tone of the article suggests moral impunity for government agencies engaging in these attacks. If it’s OK for British intelligence to hack (most likely) US based servers then it’s OK for Chinese officials to attack an ad network based in the USA if they run an ad for a dissident website.

    At first glance this looks like a cute prank. But this attack may spark the beginning of a global cyber war fought by government agencies and private contractors, the logical conclusion of which is an Iron Curtain descending on what was once an open and peaceful communication medium.

  • Money Doesn't Talk

    Money talks. Or, in this case it doesn’t.

    Have you noticed that the vast majority of published ideas will not increase your business or personal revenue? If someone has a truly great idea for increasing earnings or creating new revenue  out of thin air, they will implement or trade it themselves and will never share.

    At the point a great (tech sector) business concept is shared, it enters the highly efficient ideas market that is the Tech Echo Chamber (HN, Reddit, Slashdot, TC, etc..)  – which efficiently propagates it out to the rest of the world’s population of innovators. At this point the idea is undifferentiated, rapidly being implemented by all, and you’re in a price or other kind of efficiency war.

    This, combined with the truism that it’s not a bad idea to completely ignore your competitors and focus on your customers, makes it a pretty darn good idea to avoid spending too much time on tech publications and social media outlets. You will learn nothing new and what you will learn loses much of its value the moment it’s published. The temptation to imitate will probably harm your business as you’re bounced along in the current of swarming incompetents.

    The main (possibly only) thing I use blogs and social media reporting on tech news for is to keep track of landscape changes. Changes in the economics of a sector or changes in technology. Either of these almost always signal the start of a firestorm of innovation.

    Focus on your customers, find the truly brilliant ideas that solve customer problems and beware of sharing them too early.

    Footnote: The concept I’m describing relates to Efficient Market Hypothesis and Information Asymmetry if you’d like to read more.


  • BitCoin, Chastened

    The wannabe economist in me has been following the BitCoin phenomenon with great interest during the last few months. The algorithmic side of bitcoin is fascinating, but a few things bugged me about the system. One of them was that the maximum number of bitcoins that can ever exist is limited to 21 million.

    Most of the coverage on bitcoin has been bubbly-positive even though it’s not certain you can reliably convert bitcoins into real currency.

    Adam Cohen took a wonderfully lucid stab at bitcoin on Quora recently, focusing on the built in deflation that is a result of the hard limit on the number of coins that can exist. He makes the point that early adopters holding bitcoins will automatically get richer and it smacks of a scam.

    While scam is clearly not the intention of the creators, deflation is any economists worst nightmare and built-in deflation will probably result in bitcoin being stillborn.

  • HN is about to overtake Slashdot.

    The Alexa graph above only shows the ycombinator.com domain, but most of the traffic to the domain is HN. Also HN is visible on several other domains like hackerne.ws, which isn’t counted in the above graph, so it’s probably already passed Slashdot.

    Footnote: This post was something more political re comment scores. But I decided I don’t have the stomach for that fight, so editing and leaving just the data.


  • What would a self-launching Space Shuttle look like?

    This is the OK-GLI, part of the Soviet Shuttle Buran program, the largest and most expensive space program in the history of the Soviet Union.

    The OK-GLI completed 25 test flights between 1985 and 1988 before being retired. The OK-GLI was powered by four AL-31 jet engines with the fuel tank in the cargo bay. The highest altitude it achieved was 6000 meters or 19,000 ft. It never reached space.

    A sister ship in the Buran program, the Buran Spacecraft did reach orbit and completed two unmanned Earth orbits. It was the only orbital flight in the Buran program.