Category: Advanced Wordpress

  • Has your WordPress Blog been Hacked? Email me now!

    Big News [April 24th, 2012]: I’ve launched Wordfence to permanently fix your WordPress site’s security issues. Click here to learn more.

    If your WordPress blog has been hacked, please email me. I’m collecting data on intrusion methods and backdoors. If you’ve been hacked, I’ll examine your server free of charge, share what I find with you and will make recommendations on how to repair your site, all at no cost. Please note that I will need “Shell” access to your machine. In other words I’ll need a username and password and will log in via SSH to examine the server that hosts your WordPress blog.

    If you’re in dev or ops and have an attack vector you’d like to share, please zip it up and email it to me with as much technical detail as you can.

    Email me at mmaunder at gmail.

    Thanks!!

  • Breaking: Google starts to block hacked WordPress blogs as attack widens

    Big News [April 24th, 2012]: I’ve launched Wordfence to permanently fix your WordPress site’s security issues. Click here to learn more.

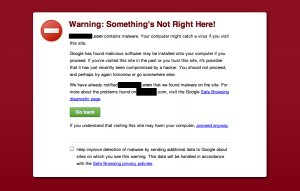
    I’ve had two reports in the last 12 hours of WordPress blogs that were compromised via the Timthumb hack being listed as malware by Google. If you try to visit either site, you are confronted with the following:


    These sites are listed with the warning that “This site may harm your computer” in Google’s search results and Google blocks access to the site with a warning forcing you to manually type the URL into your location bar if you really do want to visit the site:

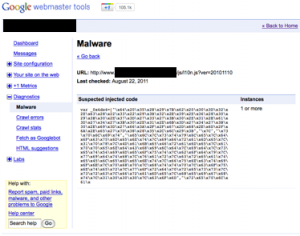
    One of the site owners sent me the detailed info that Google Webmaster Tools was giving her:

    This malicious code is appearing intermittently on this author’s WordPress site. I’ve seen this same pattern recently in blogs I’ve repaired and the way it works is that the site is periodically downloading new PHP code from a remote site run by the attacker and re-injecting it into the wordpress code. That allows the attacker to add, remove and update whatever code he/she is executing on your blog. So they could for example update any spam links every few hours.

    To prevent your site being listed as malware clean it as fast as possible

    The fastest way to do this, although it doesn’t gaurantee a complete clean, is the following:

    1. Remove all old plugins and themes you aren’t using.
    2. Upgrade all your plugins and themes to the latest versions and make sure none of them use an old version of Timthumb.
    3. Clean any Timthumb cache directories.
    4. Upgrade your entire wordpress installation, even if it’s at the latest version. This overwrites all wordpress files.
    5. Search your directory tree for any remaining suspicious files that contain base64_decode wrapped in an eval() statement or URL encoded data. More info on how to do this search here. Delete any files you find. NOTE: If you don’t find any additional infected files in this step, it’s highly likely that your site is not clean. Every attack that I’ve seen so far using Timthumb gets in by uploading a file into the cache directory and then uploads an additional file into a writeable directory on the blog to ensure continued access once the cache is cleaned. Make sure you find that additional file.
    6. Make sure the only directory that is writeable in your wordpress installation is wp-content/. Directories like wp-admin and wp-includes should be read only by the web server.

    If you are already listed as malware by Google, here is what to do

    Clean your site using the above steps. You can find more suggestions on how to clean your site on this page.
    The fastest way to get your site removed from Google’s malware list is to request a review through Google Webmaster Tools. You can find the help file on requesting a malware review on this page.
    The process takes about 24 hours to get your site removed. You can find out more about Google’s Malware list and safe browsing report on this page.


    Potential long term impact of this vulnerability

    The fact that I’ve seen the same domain being used by attackers on multiple blogs suggests this attack may be partially or fully automated. The worst case scenario is that we end up with a WordPress botnet with thousands or tens of thousands of servers on high bandwidth links compromised and able to send spam emails or launch a huge DDoS attack.

    Keep in mind that most botnets are compromised windows machines on relatively slow home broadband connections. Their uplink speeds are around 512kbps. These WordPress servers are on links that are a minimum of 10 Megabits per second each, so they have plenty of firepower for a coordinated attack. One WordPress server is equal to at least 20 infected PC’s in terms of pure bandwidth firepower.


  • WordPress Security: Please delete old themes and plugins

    News [April 24th, 2012]: I’ve launched Wordfence to permanently fix your WordPress site’s security issues. Click here to learn more.

    I was contacted by another site owner who was hacked via vulnerable WordPress themes today. He had updated to the latest non-vulnerable version of his theme, but the WordPress theme installation or update process doesn’t remove, or remind you to remove, old themes that may be vulnerable. So while they encourage you to update everything, old versions are still lurking on your site waiting for an attacker to take advantage of them.

    Remember: Delete all old unused themes and plugins.

    In this case an attacker once again used an old version of timthumb to install an attack shell called Sniper_SA. The attack shell was Arabic so I’m assuming the attack came from an Arabic country. [The last 3 I’ve seen were english]. This one was base64 encoded inside a PHP eval.

    The web host is one of the top 3 WordPress.org hosts on the web. Their default installation is to have your entire WordPress installation writeable by the web server and the server can even write to your home directory under the web root. This opens up all sorts of possibilities for a hacker to gain a remote shell. WordPress hosts, please secure your default WordPress installations so that only directories under wp-content/ are writeable. Also make sure the user’s home directory is not writeable by the web server by default.


  • DeployMint: A Staging and Deployment system for WordPress

    Exec Summary: Today I’m launching a Beta open source project called DeployMint. I’m using it on WordPress installations where WordPress is being used as a CMS. It runs as a WordPress plugin and allows for staging and deployment of WordPress sites along with robust version control and zero down-time during deployments. It uses the Git version control system to store site snapshots in a safe and space efficient way. It also takes a “belt and braces” approach and provides an emergency back-out system separate to Git in case a deployment fails. You can download the latest version of DeployMint and see a video demo at the DeployMint project page on Google Code.

    Full blog entry:

    My company is busy moving to using WordPress as a CMS and I wanted a way to instantly deploy several new pages of content or an entire site and have dev and staging sites to test new ideas. I also wanted version control, instant deployment and an emergency back-out system.

    I also needed comments to be preserved on the live site so that if I deploy a new version, the existing comments on the live site stay where they should be and only page or post content is updated.

    So I created a WordPress plugin called DeployMint.

    DeployMint runs under WordPress MU. You create as many subdomains as you would like, for example:

    • development.example.com
    • staging.example.com
    • example.com (your live site)
    1. Then you design  your entire site with themes, pages, content on development.example.com.
    2. Once you’re done, you take a snapshot of development.example.com and deploy that snapshot to staging.example.com.
    3. Your client reviews the new site on staging.example.com and suggests changes.
    4. You make the changes on development.example.com, take a new snapshot and deploy that snapshot to staging.example.com
    5. Once your client is happy, you take a snapshot of staging.example.com and deploy it to example.com, your live site.

    Here is a video showing the basic functionality of DeployMint. DeployMint is installed on this blog and I use it to test out new themes and design changes. It works as well on a blog or when WordPress is being used as a CMS. In this video I take a snapshot of my live site (this blog) and deploy it to my staging site staging.markmaunder.com. Then I make a minor modification, I re-snapshot the staging blog and deploy that snapshot to the live site.

    DeployMint is space efficient because it uses Git to store snapshots. It also makes a full copy of your entire WordPress database including all your WordPress MU sites every time you deploy. Because these require more space, you can choose how many of these full backups you want to keep. If things go awry with your database or deployment for some reason, you have an emergency backout system that will restore your WordPress MU installation to the state it was in before your previous deployment.

    Behind the scenes, DeployMint (DM) works as follows:

    • To install DeployMint you need to create a data directory that is not under your web root, but is writable by your web server.
    • When you create a new project, a new Git repository is created.
    • When you take a snapshot, DM dumps all tables belonging to the blog you snapshotted into individual files.
    • Those files are checked into a ‘Git’ repository. DM uses git for storage because it’s space efficient and robust.
    • Every snapshot you create is a new branch in the repository and only the changes are stored.
    • When you deploy using DM, it simply checks out the branch you want to deploy and imports it into a temporary database.
    • In that temp database, we merge all existing comments on your site into the site we’re about to deploy.
    • DM also modifies any hostnames it needs to, to reflect the site we’re about to deploy to’s hostname.
    • Before deployment, DM takes a full backup of your entire WordPress MU database including all sites and stores this for emergencies in case you need to back-out your changes.
    • These backups take up more disk space than snapshots, so you can choose how many of them you want to keep and DM auto-deletes the oldest ones first.
    • Then a rename is done which takes a few hundredths of a second to replace your old database with the new database we’re deploying.
    • And you’re live with your new site!

    Please post a comment below if you have any features suggestions or comments. Thanks.

  • Advanced WordPress: How to get Real WordPress Commenter IP Addresses behind your Nginx Proxy

    News [April 24th, 2012]: I’ve launched Wordfence to permanently fix your WordPress site’s security issues. Click here to learn more.

    If you run a reasonably high traffic blog on a small Linode server like this one, it’s a really good idea to set up an Nginx front-end proxy for your Apache server. It lets you handle relatively high traffic without running out of apache children while keeping keep-alive enabled.

    You can read more about how to set up Nginx and other tips on my Basic WordPress Speedup page.

    If you have set up Nginx, you’ll notice that your comments no longer have the real IP address of visitors to your site. They’re all 127.0.0.1 or something similar.

    The way I solved this was to edit my php.ini file. On my Ubuntu server this lives in /etc/php5/apache2/php.ini

    I modifed the auto_prepend_file variable to look like this:

    auto_prepend_file = /etc/php5/apache2/mdm.php

    Then in the mdm.php file I put this:


    <?php
    $mdm_headers = apache_request_headers();
    $_SERVER['REMOTE_ADDR'] = $mdm_headers["X-Forwarded-For"];
    ?>


    This assumes you have the following line in your Nginx.conf to forward the real IP address:

    proxy_set_header X-Forwarded-For $remote_addr;


  • Advanced WordPress: The Basic WordPress Speedup

    There are many caching products, plugins and config suggestions for WordPress.org blogs and sites but I’m going to take you through the basic WordPress speedup procedure. This will give you a roughly 280% speedup and the ability to handle high numbers of concurrent visitors with little additional software or complexity. I’m also going to throw in a few additional tips on what to look out for down the road, and my opinion on database caching layers. Here goes…

    How Fast is WordPress out of the Box?

    [HP/S = Home Page Hits per second and BE/S = Blog Entry Page Hits per Second]

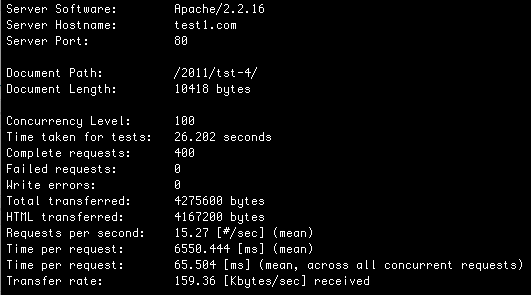
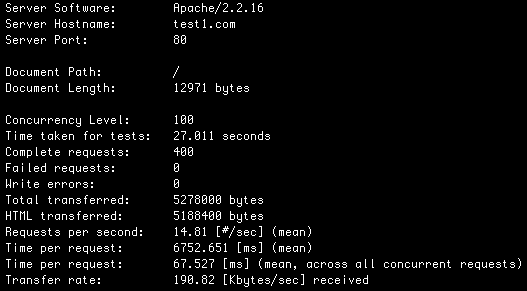
    Lets start with a baseline benchmark. WordPress, out of the box, no plugins, running on a Linode 512 server will give you:

    14.81 HP/S and 15.27 BE/S.
    First add an op code cache to speed up PHP execution

    That’s not bad. WordPress out of the box with zero tweaking will work great for a site with around 100,000 daily pageviews and a minor traffic spike now and then. But lets make a ridiculously simple change and add an op code cache to PHP by running the following command in the Linux shell as root on Ubuntu:

    apt-get install php-apc

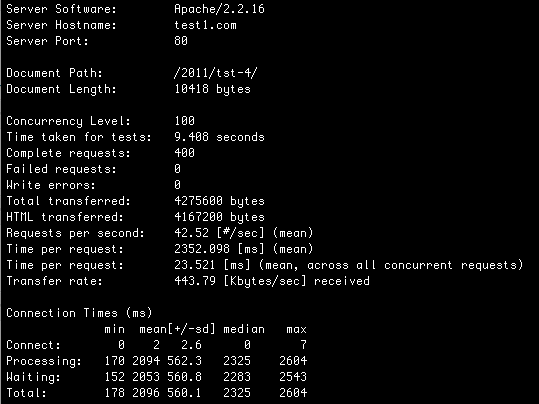
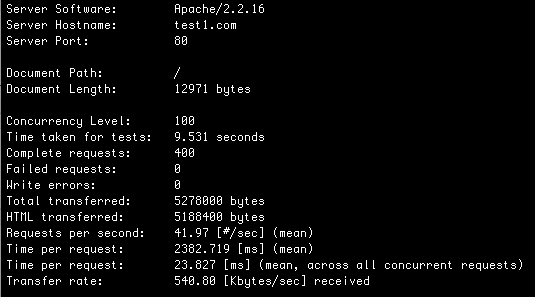
    And lets check our benchmarks again:

    41.97 HP/S and 42.52 BE/S
    WOW! That’s a huge improvement. Lets do more…

    Then install Nginx to handle high numbers of concurrent visitors

    Most of your visitors take time to load each page. That means they stay connected to Apache for as much as a few seconds, occupying your Apache children. If you have keep-alive enabled, which is a good thing because it speeds up your page load time, each visitor is going to occupy your Apache processes for a lot longer than just a few seconds. So while we can handle a high number of page views that are served up instantly, we can’t handle lots of visitors wanting to stay connected. So lets fix that…

    Putting a server in front of Apache that can handle a huge number of concurrent connections with very little memory or CPU is the answer. So lets install Nginx and have it deal with lots of connections hanging around, and have it quickly connect and disconnect from Apache for each request, which frees up your Apache children. That way you can handle hundreds of visitors connected to your site with keep-alive enabled without breaking a sweat.

    In your apache2.conf file you’ll need to set up the server to listen on a different port. I modify the following two lines:

    NameVirtualHost *:8011

    Listen 127.0.0.1:8011

    #Then the start of my virtualhost sections also looks like this:

    <VirtualHost *:8011>


    In your nginx.conf file, the virtual host for my blog looks like this (replace test1.com with your hostname)

    #Make sure keepalive is enabled and appears somewhere above your server section. Mine is set to 5 minutes.

    keepalive_timeout  300;

    server {
    listen 80;
    server_name .test1.com;
    access_log logs/test.access.log main;
    location / {
    proxy_pass http://127.0.0.1:8011;
    proxy_set_header host $http_host;
    proxy_set_header X-Forwarded-For $remote_addr;
    }

    And that’s basically it. Other than the above modifications you can use the standard nginx.conf configuration along with your usual apache2.conf configuration. If you’d like to use less memory you can safely reduce the number of apache children your server uses. My configuration in apache2.conf looks like this:

    <IfModule mpm_prefork_module>
    StartServers 15
    MinSpareServers 15
    MaxSpareServers 15
    MaxClients 15
    MaxRequestsPerChild 1000
    </IfModule>

    With this configuration the blog you’re busy reading has spiked comfortably to 20 requests per second (courtesy of HackerNews) without breaking a sweat. Remember that Nginx talks to Apache only for a few microseconds for each request, so 15 apache children can handle a huge number of WordPress hits. The main limitation now is how many requests per second your WordPress installation can execute in terms of PHP code and database queries.

    You are now set up to handle 40 hits per second and high concurrency. Relax, life is good!

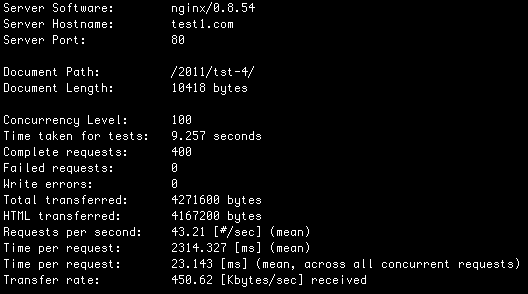
    With Nginx on the front end and your op code cache installed, we’re clocking in at:

    41.23 HP/S and 43.21 BE/S
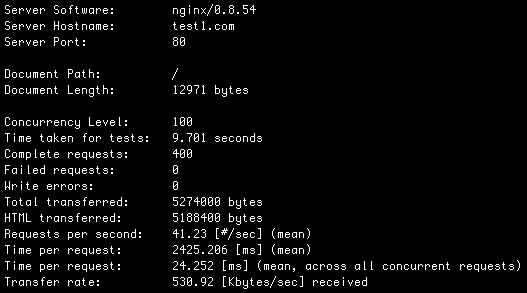

    We can also handle a high number of concurrent visitors. Nginx will queue requests up if you get a worst case scenario of a sudden spike of 200 people hitting your site. At 41.23 HP/S it’ll take under 5 seconds for all of them to get served. Not too bad for a worst case.

    Compression for the dialup visitors

    Latency, or the round trip time for packets on the Internet is the biggest slow down for websites (and just about everything else that doesn’t stream). That’s why techniques like keep-alive really speed things up because they avoid a three way handshake when visitors to your site establish their connections. Reducing the amount of data transferred by using compression doesn’t give a huge speedup for broadband visitors, but it will speed things up for visitors on slower connections. To add Gzip to your Nginx configuration, simply add the following to the top of your nginx.conf file:

    gzip on;
    gzip_min_length 1100;
    gzip_buffers 4 8k;
    gzip_types text/plain text/css application/x-javascript application/javascript text/xml application/xml application/xml+rss text/javascript;

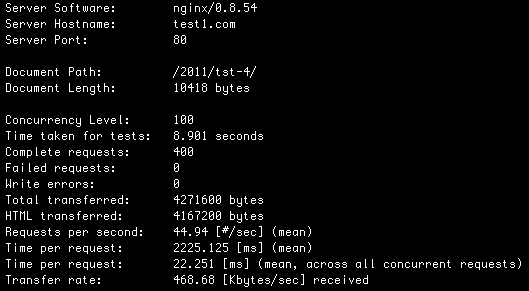
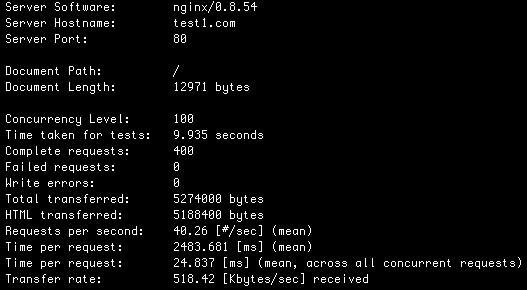
    We’re still benchmarking at:

    40.26 HP/S and 44.94 BE/S

    What about a database caching layer?

    The short answer is: Don’t bother, but make darn sure you have query caching enabled in MySQL.

    Here’s the long answer:

    I run WordPress on a 512 Linode VPS which is a small but popular configuration. Linode’s default MySQL configuration has 16M key buffer for MyISAM key caching and it has the query cache enabled with 16M available.

    First I created a test Linode VPS to do some benchmarking. I started with a fresh WordPress 3.1.3 installation with no plugins enabled. I created a handful of blog entries.

    Then I enabled query logging on the mysql server and hit the home page with a fresh browser with an empty cache. I logged all queries that WordPress used to generate the home page. I also hit refresh a few times to make sure there were no extra queries showing up.

    I took the queries I saw and put them in a benchmarking loop.

    I then did the same with a blog entry page – also putting those queries in a benchmark script.

    Here’s the resulting script.

    Benchmarking this on a default Linode 512 server I get:

    447.9 home page views per second (in purely database queries).

    374.14 blog entry page views per second (in purely database queries).

    What this means is that the “problem” you are solving when adding a database caching layer to WordPress is the database’s inability to handle more than 447 home page views per second or 374 blog entry page views per second (on a Linode 512 VPS).

    So my suggestion to WordPress.org bloggers is to forgo adding the complexity of a database caching layer and focus instead on other areas where real performance issues exist (like providing a web server that supports keep-alive and can also handle a high number of concurrent visitors – as discussed above).

    Make sure there are two lines in your my.cnf mysql configuration file that read something like:

    query_cache_limit       = 1M

    query_cache_size        = 16M

    If they’re missing your query cache is probably disabled. You can find your mysql config file at /etc/mysql/my.cnf on Ubuntu.

    Footnotes:

    Just for fun, I disabled MySQL’s query cache to see how the benchmarking script performed:

    132.1 home page views per second (in DB queries)

    99.6 blog entry page views per second (in DB queries)

    Not too bad considering I’m forcing the db to look up the data for every query. Remember, I’m doing this on one of the lowest end servers money can buy. So how does this perform on a dedicated server with Intel Xeon E5410 processor, 4 gigs of memory and 15,000 rpm mirrored SAS drives? [My dev box for Feedjit 🙂  ]

    1454.6 home page views per second

    1157.1 blog entry page views per second

    Should you use browser and/or server page caching?

    Short answer: Dont’ do it.

    You could force browsers to cache each page for a few minutes or a few hours. You could also generate all your wordpress pages into static content every few seconds or minutes. Both would give you a significant performance boost, but will hurt the usability of your site.

    Visitors will hit a blog entry page, post a comment, hit your home page and return to the blog entry page to check for replies. There may be replies, but they won’t see them because you’ve served them a cached page. They may or may not return. You make your visitor unhappy and lose the SEO value of the comment reply they could have posted.

    Heading into the wild blue yonder, what to watch out for…

    The good news is that you’re now set up to handle big traffic spikes on a relatively small server. Here are a few things to watch out for:

    Watch out for slow plugins, templates or widgets

    WordPress’s stock installation is pretty darn fast. Remember that each plugin, template and widget you install executes it’s own PHP code. Now that your server is configured correctly, your two biggest bottlenecks that affect how much traffic you can handle are:

    1. Time spent executing PHP code
    2. Time spent waiting for the database to execute a query

    Whenever you install a new plugin, template or widget, it introduces new PHP code and may introduce new database queries. Do one or all of the following:

    1. Google around to see if the plugin/widget/template has any performance issues
    2. Check the load graphs on your server for the week after you install to see if there’s a significant increase in CPU or memory usage or disk IO activity
    3. If you can, use ‘ab’ to benchmark your server and make sure it matches any baseline you’ve established
    4. Use Firebug, YSlow or the developer tools in Chrome or Safari (go to the Network panel) and check if any page component is taking too long to load. Also notice the size of each component and total page size.

    Keep your images and other page components small(ish)

    Sometimes you just HAVE to add that hi-res photo. As I mentioned earlier, latency is the real killer, so don’t be too paranoid about adding a few KB here and there for usability and aesthetics. But mind you don’t accidentally upload an uncompressed 5MB image or other large page component, unless that was your intention.

    Make sure any Javascript is added to the bottom of your page or is loaded asynchronously

    Javascript execution can slow down your page load time if it executes as the page loads. Unless a vendor tells you that their javascript executes asynchronously (without causing the page to wait), put their code at the bottom of the page or you’ll risk every visitor having to wait for that javascript to see the rest of your page.

    Don’t get obsessive, it’s not healthy!

    It’s easy to get obsessed with eeking out every last millisecond in site performance. Trust me, I’ve been there and I’m still in recovery. You can crunch your HTML, use CSS sprites, combine all scripts into a single script, block scrapers and Yahoo (hehe), get rid of all external scripts, images and flash, wear a woolen robe, shave your head and only eat oatmeal. But you’ll find you hit a point of diminishing returns and the time you’re spending preparing for those traffic spikes could be better spent on getting the traffic in the first place. Get the basics right and then deal with specific problems as they arise.

    “We should forget about small efficiencies, say about 97% of the time: premature optimization is the root of all evil” ~Donald Knuth

    Conclusion

    The two most effective things you can do to a new WordPress blog to speed it up are to add an op code cache like APC, and to configure it to handle a high number of concurrent visitors using Nginx. Nothing else in my experience will give you a larger speed and concurrency improvement. Please let me know in the comments if you’ve found another magic bullet or about any errors or omissions. Thanks.