Category: Wordpress

  • WordThumb can now take screenshots of websites for you

    UPDATE: WordThumb has now been merged into TimThumb and has become TimThumb 2.0. Please head over to the TimThumb site now for updates and to get the code.

    Just for fun I added the ability to take screenshots of any website to WordThumb. You can even apply all the image manipulation and filters that it supports for regular images to a website screenshot.

    The latest update also lets you block “hotlinking” where other websites display an image loaded from your server. That is mainly to prevent other sites using your WordThumb to generate thumbnails of websites.

    Be warned, to use this you’re going to need root access to your own server. You’re also going to have to install a few basic tools, but I’ve included detailed installation instructions in the source where the configuration options are. I’ve also only tested this on Ubuntu Linux.

    If you don’t have root on your machine or don’t want the feature, WordThumb is still fully backwards compatible with timthumb.php and the webshots feature is off by default. But if you like to experiment give it a whirl and let me know what you think.

    The first screenshot takes a few seconds to load and then it’s cached for 24 hours (the default cache setting).

    I have it running on this server, so here are a few screenshots of my favorite sites created and updated using WordThumb. You can click on one of these images and play with the URL and image width/height in the location bar to load different sites. My server is at about 80% load right now, so it will probably run faster on a less busy machine.

  • A secure rewrite of timthumb.php as WordThumb

    Big News [April 24th, 2012]: I’ve launched Wordfence to permanently fix your WordPress site’s security issues. Read this now.

    Update 3 (Final): WordThumb has now been merged into TimThumb and has become TimThumb 2.0. Please head over to the TimThumb site now for updates and to get the code.

    Update 2: WordThumb can now take screenshots of websites for you and turn them into thumbnails.

    Update 1: Two minor bugs fixed and new minor version released. Thanks guys! You can post bugs directly on this page if you find any more.

    I’ve done a full top to bottom rewrite of timthumb and forked the project as WordThumb. You can find it on Google Code with basic instructions on how to use it. Please report any bugs to me at mmaunder at gmail as soon as you can. The code is tested on Ubuntu Linux under Apache and works great.

    The only code that is still original timthumb code is the image processing routines. Everything else has been rewritten from scratch. Here are the changes:

    • Code is now object oriented PHP and is much more manageable and readable. It will still run just about anywhere.
    • Fully backwards compatible with all timthumb’s options.
    • Uses a non-web accessible directory as cache for security. By default it uses the system temporary directory. There is a config option to override this.
    • All cached files have a .txt extension as an extra precaution.
    • Cache cleaning has been rewritten to be faster and only run once a day (user configurable) with no contention between processes.
    • ALLOW_EXTERNAL now works as expected. If disabled, you can’t load external files.
    • mime type checking is improved. Previously files would be written to a web accessible cache before the mime check step. Now the furthest a non-image will get is a temporary file which fails a mime check and is deleted.
    • Previously, the check_cache function created a directory with 777 permissions. That’s removed and we simply use the system temporary directory for everything cache related now.
    • Writing images uses file locking now to avoid two processes writing to the same image file and corrupting it.
    • We now use temporary files when fetching remote images rather than using the same filename we’re turning into a thumbnail. This avoids another process on a busy server thinking a file is a cached thumbnail and serving an unprocessed image accidentally.
    • Fixed browser headers like accept-ranges.
    • Improved error reporting.
    • Added debug mode with tons of debug messages.
    • Debug messages include benchmarking to see where slowdowns occur if any. (It’s very fast!)
    • Cleaned up conflicting curl options like CURLOPT_FILE
    • Added ability to disable browser caching for debugging
    • Added clarity on curl timeout (many sites use php’s default fetching which doesn’t have a timeout)
  • Technical details and scripts of the WordPress Timthumb.php hack

    Big News [April 24th, 2012]: I’ve launched Wordfence to permanently fix your WordPress site’s security issues. Read this now.

    UPDATE: WordThumb has now been merged into TimThumb and has become TimThumb 2.0. Please head over to the TimThumb site now for updates and to get the code.

    As I mentioned yesterday my WordPress blog was hacked. The security hole has been picked up by hacker news and from there, The Register, ZDNet, PCWorld, and Geek.com among others. The publicity will hopefully get Theme developers to update timthumb.php or switch to a different thumbnail generator.

    I’ve been contacted with requests for detailed info, so I’m going to post the technical details of how my site was hacked along with the scripts that the hacker used to get in. This is targeted at a technical audience.

    The server that served you this web page is the one that was hacked. It runs Ubuntu 10.10 with all security updates installed. It is a virtual server hosted by Linode.

    I also run the latest version of WordPress.org.

    My WordPress root directory was writable, but making it read only would not have prevented the hack.

    Timthumb.php in it’s default configuration allows site visitors to load images from a predefined set of remote websites for resizing and serving. Timthumb offers a caching mechanism so that it doesn’t have to continually re-process images. The cache directory lives under the wordpress root and is accessible by visitors to the website.

    The ability for a site visitor to load content from a remote website and to make the web server write that remote content to a web accessible directory is the cause of the vulnerability in timthumb.php.

    To be clear, timthumb.php does not actually execute any remote malicious code that causes this vulnerability. This was a point of confusion among some commenters in my blog post yesterday. It simply gets a remote file and places it in a web accessible directory.

    Timthumb only allows remote content from a small range of websites to be loaded remotely. In it’s default configuration these included Blogger, WordPress.com and other sites that are writeable by the general public.

    Timthumb’s verification that remote content was only being loaded by these domains was also broken. You could for example load content from hackersiteblogspot.com or from blogspot.com.hackersite.com.

    I’ve submitted a patch that fixes the pattern matching and removed all default public hosting sites from the allowed sites list. The developer has opted to keep a small list in which I’m not in favor of.

    In my case the hacker uploaded a script to my cache directory which timthumb.php stores as “external_<md5 hash>.php”. He/she then accessed this script directly in my timthumb cache directory as something like https://markmaunder.com/wp-content/themes/Memoir/scripts/cache/external_md5hash.php

    The script uploaded was Alucar shell which is base64 encoded and decodes when it executes. That makes it a little harder to find it using grep or similar tool. You can see the encoded version of Alucar here and the decoded version of Alucar here (without the username and password preamble at the top).

    Here’s a screenshot of the UI:

    Alucar UI

    This script which gives a web based shell access was then used to inject base64 code to one of my core wordpress files wp-blog-header.php which lives in the wordpress root directory. The file with injected code looked like this.

    The decoded version of this base64 code is this. The code executes whenever a blog page is visited. It fetches a file from a URL and writes it to /tmp. Then it executes the php code that is contained in this file. In my case it simply echo’d some javascript code that would show ads. Here is the code contained in the file in /tmp.

    Again, this file is periodically updated with new PHP code, so the attacker could have his way with my server until I found out about it. The code could be altered to instead become a spam system and work it’s way through a long list of spam emails.

    The way I tracked this to conclusion was:

    • Heard audio on my blog telling me I’d won something.
    • Checked Chrome network tools and saw ad content loading and I don’t serve ads.
    • Grepped wordpress source and themes for hostname I saw in ad. Nothing.
    • Dumped mysql databases on server (all of them) and grepped for hostname. Nothing.
    • Confusion reigns.
    • Started working my way through nginx (which is my front end proxy to apache) and apache access and error logs.
    • Spotted lines in apache error log like this: “[Mon Aug 01 11:09:12 2011] [error] [client 127.0.0.1] PHP Warning: file_get_contents(http://blogger.com.zoha.vn/db/load.php): failed to open stream: HTTP request failed! in /usr/local/markmaunder/wp-content/themes/Memoir/timthumb.php on line 675”
    • Checked timthumb’s cache directory and found Alucar.
    • Realized base64 encoding is why I didn’t find anything with grep.
    • Regrepped wordpress source and database and found injection in wp-blog-header.php
    • Decoded base64 stuff and played with Alucar
    • Found tmp file in /tmp
    • Cleaned everything and fixed permissions. Ran chkrootkit and other utils on machine to see if anything else was compromised. Changed passwords, etc.


  • Zero Day Vulnerability in many WordPress Themes

    Big News [April 24th, 2012]: I’ve launched Wordfence to permanently fix your WordPress site’s security issues. Read this now.

    Update: WordThumb has now been merged into TimThumb and has become TimThumb 2.0. Please head over to the TimThumb site now for updates and to get the code.

    Update 4: I’ve also added the ability to screenshot websites to WordThumb.

    Update 3: I have forked timthumb.php into a new secure thumbnailer project called WordThumb. It’s a complete rewrite of timthumb and is fully backwards compatible. The only code that is recognizable is the image processing code. All file handling has been rewritten from scratch and I’ve fixed quite a few bugs. The project is now live on Google Code and version 1.0 of WordThumb is up for download. You can read more details about the changes in this blog entry about WordThumb.

    Update 2: After evaluating timthumb.php I’ve decided the best solution to the security problem is to fork the project and do a line-by-line rewrite. I started work on this a day ago and it will be published on this blog later today. (This was posted on Wednesday at 11am Pacific Time). Please check my blog’s home page this evening (in about 8 hours) and it should be done.

    Update: Ben, the developer of timthumb has been in contact and is working on a fix. His own site was hacked Friday using the same method. I’ve submitted a tiny patch and if you’re a solid PHP hacker it’d be great if you could eyeball the code with us and submit a patch (really easy to do on Google code) if you spot any other opportunities for cleanup (there are many). Given enough eyeballs… you know the quote.

    The Exec summary: An image resizing utility called timthumb.php is widely used by many WordPress themes. Google shows over 39 million results for the script name. If your WordPress theme is bundled with an unmodified timthumb.php as many commercial and free themes are, then you should immediately either remove it or edit it and set the $allowedSites array to be empty. The utility only does a partial match on hostnames allowing hackers to upload and execute arbitrary PHP code in your timthumb cache directory. I haven’t audited the rest of the code, so this may or may not fix all vulnerabilities. Also recursively grep your WordPress directory and subdirs for the base64_decode function and look out for long encoded strings to check if you’ve been compromised.

    How to fix:
    Update: As per several requests I’m posting hopefully easy to use instructions on how to fix this. This is for the latest version of timthumb.php version 1.33 available here. Check your version because there are many much older versions floating around.

    NOTE: timthumb.php is inherently insecure because it relies on being able to write files into a directory that is accessible by people visiting your website. That’s never a good idea. So if you want to be truly secure, just delete the file using “rm timthumb.php” and make sure it didn’t break anything in the theme you’re using.  If you still want to use it but want to be a bit more secure, you can follow the instructions below.

    This will disable timthumb.php’s ability to load images from external sites, but most bloggers only use timthumb.php for resizing local images:

    1. SSH into your web server. You can use “putty” if you use windows and you’ll need to know your username and password.
    2. cd into your wordpress installation directory. That is going to vary according to which host you’re using or how you’ve installed it.
    3. You need to find every copy of timthumb.php on your system. Use the following command without double quotes: ” find . -name ‘timthumb.php’ “
    4. It will show you a list of where timthumb.php is located. You may want to repeat this command using “thumb.php” as some users have reported that’s what it’s called on their systems.
    5. Edit timthumb.php using a text editor like pico, nano or (if you know what you’re doing) vim. You would type (without double quotes) ” nano directory/that/tim/thumb/is/in/timthumb.php ” for example.
    6. Go down to line 27 where it starts $allowedSites = array (
    7. Change it to remove all the sites listed like “blogger.com” and “flickr.com”. Once you’re done the line should look like this from $allowedSites to the semi-colon:
    8. $allowedSites = array();
    9. Note the empty parentheses.
    10. The next line should be blank and the following line will probably say “STOP MODIFYING HERE”
    11. That’s it. Save the file and you’re done.

    Full post:

    Earlier today this blog was hacked. I found out because I loaded a page on my blog and my blog spoke to me. It said “Congratulations, you’re a winner”.

    After a brief WTF? I loaded up the dev tools in Chrome and checked what network requests were going out. Ad content was loading and I don’t run ads on my blog. For some reason the content was hidden, perhaps someone gets paid per impression.

    I found the hostname the ads were loading from and grepped the WordPress code for the hostname and nothing turned up. Next I dumped the database  – in fact all mysql databases on the server and grepped for the ad hostname and still nothing.

    Eventually I found it. The hacker had done an eval(base64_decode(‘…long base64 encoded string’)) in one of WordPress PHP files. My bad for allowing that file to be writeable by the web server. Read on, because even if you set your file permissions correctly on the WordPress php files, you may still be vulnerable.

    But what I really wanted to know was how the hell he wrote to a file on my machine.

    I checked my nginx and apache access and error logs and eventually found a few PHP errors in the apache log that clued me in.

    Turns out the theme I’m using, Memoir, which I bought for $30 from ElegantThemes.com uses a library called timthumb.php. timthumb.php uses a cache directory which lives under wp-content and it writes to that directory when it fetches an image and resizes it.

    If you can figure out a way to get timthumb to fetch a php file and put it in that directory, you’re in.

    The default configuration of timthumb.php which many themes use allow files to be remotely loaded and resized from the following domains:

    $allowedSites = array (
    	'flickr.com',
    	'picasa.com',
    	'blogger.com',
    	'wordpress.com',
    	'img.youtube.com',
    	'upload.wikimedia.org',
    	'photobucket.com',
    );

    The problem is the way the developer checks which domain he’s fetching from. He uses the PHP strpos function and if the domain string appears anywhere in the hostname, he’ll allow that file to be fetched.

    So if you create a file on a web server like so: http://blogger.com.somebadhackersite.com/badscript.php and tell timthumb.php to fetch it, it merrily fetches the file and puts it in the cache directory ready for execution.

    [Note: I’m 99% sure this will work on most webserver configurations because the cache directory that timthumb uses is a subdirectory of directories that are allowed to execute files with a .php extension. So unless you explicitly tell your server to not execute .php files in the cache directory, it’ll execute them. ]

    Then you just access the file in the cache directory on the target site using your web browser and whatever code came from http://blogger.com.somebadhackersite.com/badscript.php will get executed by the web server.

    In my case, this is what the hacker saw when he accessed my site:

    It’s called Alucar shell and it’s a php file that contains one massive base64 encoded string that gets decoded and evalled. It’s encoded in an attempt to hide itself.

    When you first hit the script it presents you with a login page and once you’re signed in you see the screenshot above. It works quite well actually. Even if the rest of your filesystem is secure, whoever is using it can dump read-only files like /etc/passwd to get a list of user accounts, config files which may contain passwords, etc..etc..

    The current version of timthumb has this issue. Since it’s already in the wild and I just got hacked by it, I figure it’s ok to release the vulnerability to the general public.

    To check if you have been hacked do the following:

    1. Sign into your server using ssh
    2. cd to your wordpress installation directory
    3. run “grep -r base64_decode *”
    4. You should see a few occurences but if any of them have a long encoded string between the parentheses, then you’re probably hacked.
    The hacker used base64_decode in the file uploaded to the timthumb.php cache directory as well as where he injected code in my blog.
    Also check your /tmp/ directory and if you have any suspicious files there like xwf.txt or any other .txt files, look at them in a text editor.
    How to (possibly) fix this:
    1. Go into your theme directory and figure out where timthumb.php is.
    2. You might try “find /your/wordpress/dir/wp-content/themes/YourTheme/ -name “timthumb.php””
    3. Edit timthumb and remove the list of external websites that content is allowed to be loaded from.
    4. I have not audited the rest of the code, so this may or may not make it secure.
    5. The developer really needs to use a regular expression to check the external hostnames images can be loaded from.
    I would also recommend that if you’re a theme developer using timthumb.php, you check to see how it’s configured and try to load a php file from blogger.com.yoursite.com to see if you’re vulnerable.
  • Advanced WordPress: The Basic WordPress Speedup

    There are many caching products, plugins and config suggestions for WordPress.org blogs and sites but I’m going to take you through the basic WordPress speedup procedure. This will give you a roughly 280% speedup and the ability to handle high numbers of concurrent visitors with little additional software or complexity. I’m also going to throw in a few additional tips on what to look out for down the road, and my opinion on database caching layers. Here goes…

    How Fast is WordPress out of the Box?

    [HP/S = Home Page Hits per second and BE/S = Blog Entry Page Hits per Second]

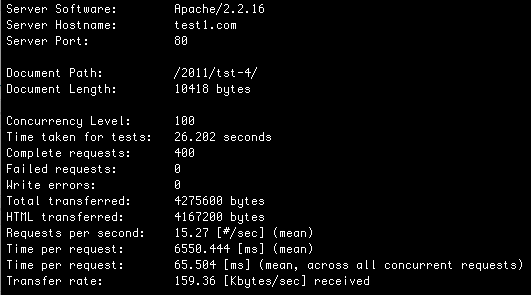
    Lets start with a baseline benchmark. WordPress, out of the box, no plugins, running on a Linode 512 server will give you:

    14.81 HP/S and 15.27 BE/S.
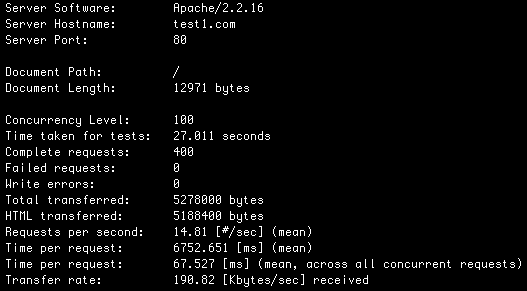
    First add an op code cache to speed up PHP execution

    That’s not bad. WordPress out of the box with zero tweaking will work great for a site with around 100,000 daily pageviews and a minor traffic spike now and then. But lets make a ridiculously simple change and add an op code cache to PHP by running the following command in the Linux shell as root on Ubuntu:

    apt-get install php-apc

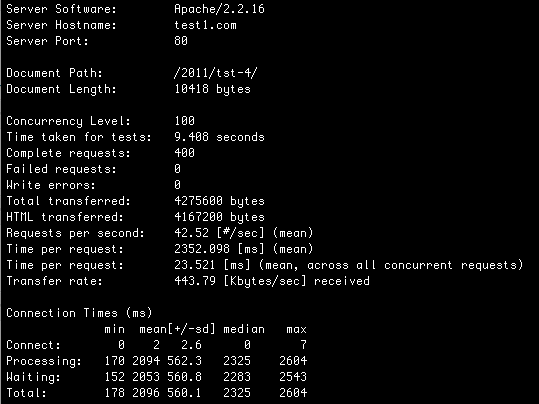
    And lets check our benchmarks again:

    41.97 HP/S and 42.52 BE/S
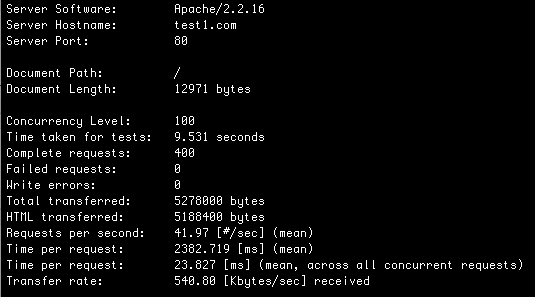
    WOW! That’s a huge improvement. Lets do more…

    Then install Nginx to handle high numbers of concurrent visitors

    Most of your visitors take time to load each page. That means they stay connected to Apache for as much as a few seconds, occupying your Apache children. If you have keep-alive enabled, which is a good thing because it speeds up your page load time, each visitor is going to occupy your Apache processes for a lot longer than just a few seconds. So while we can handle a high number of page views that are served up instantly, we can’t handle lots of visitors wanting to stay connected. So lets fix that…

    Putting a server in front of Apache that can handle a huge number of concurrent connections with very little memory or CPU is the answer. So lets install Nginx and have it deal with lots of connections hanging around, and have it quickly connect and disconnect from Apache for each request, which frees up your Apache children. That way you can handle hundreds of visitors connected to your site with keep-alive enabled without breaking a sweat.

    In your apache2.conf file you’ll need to set up the server to listen on a different port. I modify the following two lines:

    NameVirtualHost *:8011

    Listen 127.0.0.1:8011

    #Then the start of my virtualhost sections also looks like this:

    <VirtualHost *:8011>


    In your nginx.conf file, the virtual host for my blog looks like this (replace test1.com with your hostname)

    #Make sure keepalive is enabled and appears somewhere above your server section. Mine is set to 5 minutes.

    keepalive_timeout  300;

    server {
    listen 80;
    server_name .test1.com;
    access_log logs/test.access.log main;
    location / {
    proxy_pass http://127.0.0.1:8011;
    proxy_set_header host $http_host;
    proxy_set_header X-Forwarded-For $remote_addr;
    }

    And that’s basically it. Other than the above modifications you can use the standard nginx.conf configuration along with your usual apache2.conf configuration. If you’d like to use less memory you can safely reduce the number of apache children your server uses. My configuration in apache2.conf looks like this:

    <IfModule mpm_prefork_module>
    StartServers 15
    MinSpareServers 15
    MaxSpareServers 15
    MaxClients 15
    MaxRequestsPerChild 1000
    </IfModule>

    With this configuration the blog you’re busy reading has spiked comfortably to 20 requests per second (courtesy of HackerNews) without breaking a sweat. Remember that Nginx talks to Apache only for a few microseconds for each request, so 15 apache children can handle a huge number of WordPress hits. The main limitation now is how many requests per second your WordPress installation can execute in terms of PHP code and database queries.

    You are now set up to handle 40 hits per second and high concurrency. Relax, life is good!

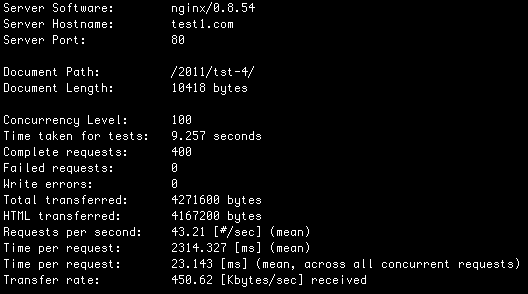
    With Nginx on the front end and your op code cache installed, we’re clocking in at:

    41.23 HP/S and 43.21 BE/S
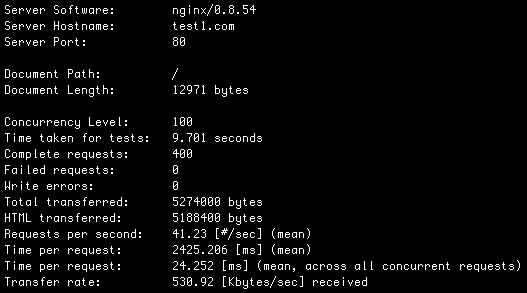

    We can also handle a high number of concurrent visitors. Nginx will queue requests up if you get a worst case scenario of a sudden spike of 200 people hitting your site. At 41.23 HP/S it’ll take under 5 seconds for all of them to get served. Not too bad for a worst case.

    Compression for the dialup visitors

    Latency, or the round trip time for packets on the Internet is the biggest slow down for websites (and just about everything else that doesn’t stream). That’s why techniques like keep-alive really speed things up because they avoid a three way handshake when visitors to your site establish their connections. Reducing the amount of data transferred by using compression doesn’t give a huge speedup for broadband visitors, but it will speed things up for visitors on slower connections. To add Gzip to your Nginx configuration, simply add the following to the top of your nginx.conf file:

    gzip on;
    gzip_min_length 1100;
    gzip_buffers 4 8k;
    gzip_types text/plain text/css application/x-javascript application/javascript text/xml application/xml application/xml+rss text/javascript;

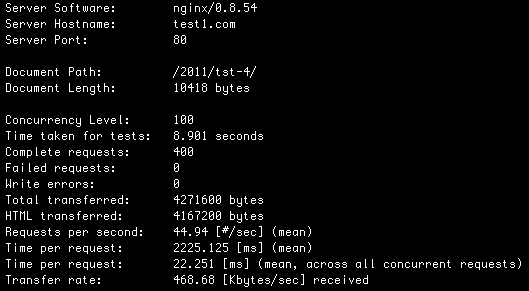
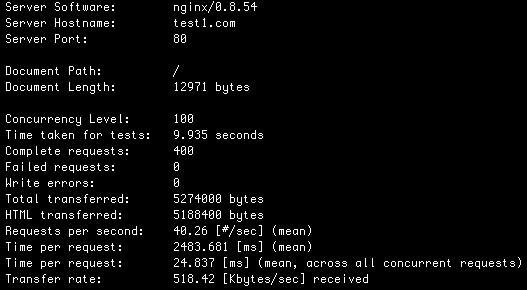
    We’re still benchmarking at:

    40.26 HP/S and 44.94 BE/S

    What about a database caching layer?

    The short answer is: Don’t bother, but make darn sure you have query caching enabled in MySQL.

    Here’s the long answer:

    I run WordPress on a 512 Linode VPS which is a small but popular configuration. Linode’s default MySQL configuration has 16M key buffer for MyISAM key caching and it has the query cache enabled with 16M available.

    First I created a test Linode VPS to do some benchmarking. I started with a fresh WordPress 3.1.3 installation with no plugins enabled. I created a handful of blog entries.

    Then I enabled query logging on the mysql server and hit the home page with a fresh browser with an empty cache. I logged all queries that WordPress used to generate the home page. I also hit refresh a few times to make sure there were no extra queries showing up.

    I took the queries I saw and put them in a benchmarking loop.

    I then did the same with a blog entry page – also putting those queries in a benchmark script.

    Here’s the resulting script.

    Benchmarking this on a default Linode 512 server I get:

    447.9 home page views per second (in purely database queries).

    374.14 blog entry page views per second (in purely database queries).

    What this means is that the “problem” you are solving when adding a database caching layer to WordPress is the database’s inability to handle more than 447 home page views per second or 374 blog entry page views per second (on a Linode 512 VPS).

    So my suggestion to WordPress.org bloggers is to forgo adding the complexity of a database caching layer and focus instead on other areas where real performance issues exist (like providing a web server that supports keep-alive and can also handle a high number of concurrent visitors – as discussed above).

    Make sure there are two lines in your my.cnf mysql configuration file that read something like:

    query_cache_limit       = 1M

    query_cache_size        = 16M

    If they’re missing your query cache is probably disabled. You can find your mysql config file at /etc/mysql/my.cnf on Ubuntu.

    Footnotes:

    Just for fun, I disabled MySQL’s query cache to see how the benchmarking script performed:

    132.1 home page views per second (in DB queries)

    99.6 blog entry page views per second (in DB queries)

    Not too bad considering I’m forcing the db to look up the data for every query. Remember, I’m doing this on one of the lowest end servers money can buy. So how does this perform on a dedicated server with Intel Xeon E5410 processor, 4 gigs of memory and 15,000 rpm mirrored SAS drives? [My dev box for Feedjit 🙂  ]

    1454.6 home page views per second

    1157.1 blog entry page views per second

    Should you use browser and/or server page caching?

    Short answer: Dont’ do it.

    You could force browsers to cache each page for a few minutes or a few hours. You could also generate all your wordpress pages into static content every few seconds or minutes. Both would give you a significant performance boost, but will hurt the usability of your site.

    Visitors will hit a blog entry page, post a comment, hit your home page and return to the blog entry page to check for replies. There may be replies, but they won’t see them because you’ve served them a cached page. They may or may not return. You make your visitor unhappy and lose the SEO value of the comment reply they could have posted.

    Heading into the wild blue yonder, what to watch out for…

    The good news is that you’re now set up to handle big traffic spikes on a relatively small server. Here are a few things to watch out for:

    Watch out for slow plugins, templates or widgets

    WordPress’s stock installation is pretty darn fast. Remember that each plugin, template and widget you install executes it’s own PHP code. Now that your server is configured correctly, your two biggest bottlenecks that affect how much traffic you can handle are:

    1. Time spent executing PHP code
    2. Time spent waiting for the database to execute a query

    Whenever you install a new plugin, template or widget, it introduces new PHP code and may introduce new database queries. Do one or all of the following:

    1. Google around to see if the plugin/widget/template has any performance issues
    2. Check the load graphs on your server for the week after you install to see if there’s a significant increase in CPU or memory usage or disk IO activity
    3. If you can, use ‘ab’ to benchmark your server and make sure it matches any baseline you’ve established
    4. Use Firebug, YSlow or the developer tools in Chrome or Safari (go to the Network panel) and check if any page component is taking too long to load. Also notice the size of each component and total page size.

    Keep your images and other page components small(ish)

    Sometimes you just HAVE to add that hi-res photo. As I mentioned earlier, latency is the real killer, so don’t be too paranoid about adding a few KB here and there for usability and aesthetics. But mind you don’t accidentally upload an uncompressed 5MB image or other large page component, unless that was your intention.

    Make sure any Javascript is added to the bottom of your page or is loaded asynchronously

    Javascript execution can slow down your page load time if it executes as the page loads. Unless a vendor tells you that their javascript executes asynchronously (without causing the page to wait), put their code at the bottom of the page or you’ll risk every visitor having to wait for that javascript to see the rest of your page.

    Don’t get obsessive, it’s not healthy!

    It’s easy to get obsessed with eeking out every last millisecond in site performance. Trust me, I’ve been there and I’m still in recovery. You can crunch your HTML, use CSS sprites, combine all scripts into a single script, block scrapers and Yahoo (hehe), get rid of all external scripts, images and flash, wear a woolen robe, shave your head and only eat oatmeal. But you’ll find you hit a point of diminishing returns and the time you’re spending preparing for those traffic spikes could be better spent on getting the traffic in the first place. Get the basics right and then deal with specific problems as they arise.

    “We should forget about small efficiencies, say about 97% of the time: premature optimization is the root of all evil” ~Donald Knuth

    Conclusion

    The two most effective things you can do to a new WordPress blog to speed it up are to add an op code cache like APC, and to configure it to handle a high number of concurrent visitors using Nginx. Nothing else in my experience will give you a larger speed and concurrency improvement. Please let me know in the comments if you’ve found another magic bullet or about any errors or omissions. Thanks.

  • Can WordPress Developers survive without InnoDB? (with MyISAM vs InnoDB benchmarks)

    Update: Thanks Matt for the mention and Joseph for the excellent point in the comments that WordPress in fact uses whatever MySQL’s default table handler is, and from 5.5 onwards, that’s InnoDB – and for his comments on InnoDB durability.

    My development energy has been focused on WordPress.org a lot during the past few months for the simple reason that I love the publishing platform and it’s hard to resist getting my grubby paws stuck into the awesome plugin API.

    To my horror I discovered that WordPress installs using the MyISAM table engine. [Update: via Joseph Scott on the Automattic Akismet team: WordPress actually specifies no table type in the create statements, so it uses MySQL’s default table engine which is InnoDB from version 5.5 onwards. See the rest of his comment below.] I absolutely loathe MyISAM because it has burned me badly in the past when table locking killed performance in very high traffic apps I’ve built. Converting to InnoDB saved the day and so I have a lot of love for the InnoDB storage engine.

    Many WordPress hosts like Hostgator don’t support anything but the default MyISAM table type that WordPress uses and they’ve made it clear they don’t plan to change.

    While WordPress is a mostly read-only application that doesn’t suffer too badly with read/write locking issues, the plugin I’m developing will be doing a fair amount of writing, so the prospect of being stuck with MyISAM is a little horrifying.

    So I set out to figure out exactly how bad my situation is being stuck with MyISAM.

    I created a little PHP script (hey, it’s WordPress so gotta go with PHP) to benchmark MySQL with both table types. Here’s what the script does:

    • Create a table using the MyISAM or InnoDB table type (depending on what we’re benching)
    • The table has two integer columns (one is a primary key) and a 255 character varchar.
    • Insert 10,000 records with randomly generated strings of 255 chars in length.
    • Fork X number of processes (I start with one and gradually increase to 56 processes)
    • Each process has a loop that iterates a number of times so that we end up with 1000 iterations evenly spaced across all processes.
    • In each iteration we do an “insert IGNORE” that may or may not insert a record, a “select *” that selects a random record that may or may not exist, and then a “delete from table order by id asc limit 3” and every second delete orders “desc” instead.
    • Because the delete is the most resource intensive operation I decided to bench it without the delete too.

    The goal is not to figure out if WordPress needs InnoDB. The answer is that it doesn’t. The goal is to figure out if plugin developers like me should be frustrated or worried that we don’t have access to InnoDB on many WordPress hosting provider platforms.


    NOTE: A lower graph is better in the benchmarks below.


    MyISAM vs InnoDB doing Insert IGNORE and Selects up to 56 processes

    The X axis shows number of threads and the Y axis shows the total time for each thread to complete it’s share of the loop iterations. Each loop does an “insert ignore” and a “select” from the primary key id.

    The benchmark below is for a typical write intensive application where multiple threads (up to 56) are selecting and inserting into the same table. I was expecting InnoDB to murder MyISAM with this benchmark, but as you can see they are extremely close (look at the Y axis on the left) and are both very fast. Not only that but they are both very stable as concurrency increases.


    MyISAM vs InnoDB doing Insert IGNORE, Selects and delete with order by

    The X axis shows number of threads and the Y axis shows the total time for each thread to complete it’s share of the loop iterations. Each loop does an “insert ignore”, a “select” from the primary key id AND a “delete from table order by id desc limit 3 (or asc every second iteration).

    This is a very intensive test in terms of locking because you have both the write operation of the insert combined with a small ordered range of records being deleted each iteration. I was expecting MyISAM to basically stall as threads increased. Instead I saw the strangest thing…..


    Rather than MyISAM stalling and InnoDB getting better under a highly concurrent load, InnoDB gave me two spikes as concurrency increased. So I did the benchmark again because I thought maybe a cron job fired on my test machine…..

    While doing the second test I kept a close eye on memory and the machine had plenty to spare. The only explanation I can come up with is that InnoDB did a buffer flush or log flush at the same point in each benchmark which killed performance.


    Conclusions

    Firstly, I’m blown away by the performance and level of concurrency that MyISAM delivers under heavy writes. It may be benefitting from concurrent inserts, but even so I would have expected it to get killed with my “delete order by” query.

    I don’t think the test I threw at InnoDB gives a complete picture of how amazing the InnoDB storage engine actually is. I use it in extremely large scale and highly concurrent environments and I use features like clustered indexes and cascading deletes via relational constraints and the performance and reliability is spectacular. But as a basic “does MyISAM completely suck vs InnoDB?” test I think this is a useful comparison, if somewhat anecdotal.

    Resources and Footnotes

    You can find my benchmark script here. Rename it to a .php extension once you download it.

    I’m running MySQL Server version: 5.1.49-1ubuntu8.1 (Ubuntu)

    I’m running PHP:
    PHP 5.3.3-1ubuntu9.5 with Suhosin-Patch
    Zend Engine v2.3.0

    Both InnoDB and MyISAM engines were tuned using the following parameters:

    InnoDB:
    innodb_flush_log_at_trx_commit = 0
    innodb_buffer_pool_size = 256M
    innodb_additional_mem_pool_size = 20M
    innodb_log_buffer_size = 8M
    innodb_max_dirty_pages_pct = 90
    innodb_thread_concurrency = 4
    innodb_commit_concurrency = 4
    innodb_flush_method = O_DIRECT

    MyISAM:
    key_buffer = 100M
    query_cache_limit = 1M
    query_cache_size = 16M

    Binary logging was disabled.
    The Query log was disabled.

    The machine I used is a stock Linode 512 instance with 512 megs of memory.
    The virtual CPU shows up as four:
    Intel(R) Xeon(R) CPU L5520 @ 2.27GHz
    with bogomips : 4533.49

    I’m running Ubuntu 10.10 Maverick Meerkat
    I’m running: Linux dev 2.6.32.16-linode28 #1 SMP